What is Profile?
* Profile is a user state environment.
* Profile contains personal setting of the users like:
- Documents.
- Desktop setting.
- Start Menu Icons.
- Shortcuts.
- Application Data.
- Downloads.
- Pictures, Musics, Videos.
- Contact.
- Favorites Etc.
Profile Types:
1. Local.
2. Roaming.
3. Mandatory.
1. Local Profile:
Local profile is a profile which is going to created and saved in a same system from where the user is login.
Disadvantages of Local profile
* As the user is changing the computer he is getting a different profile.
* Profile is not carried over through the network.
2. Roaming Profile:
* A roaming user profile is created by System Administrator and its stores on a server.
* This profile is available everywhere you login to any computer on a network.
* Change made to your roaming user profiles are updates on the server.
3. Mandatory Profile.
* A mandatory user profile is a roaming profile.
* Mandatory Profiles are fixed profiles in which the user change will no be saved.
* Only Administrators can make changes to Mandatory profiles.
Home Folder:
* Home folder is a centralized location of the users file (data).
* Home folder make it easier for an administrator to back up user files by collecting all user's files in the location.
* whenever the user log on any computer in a Domain, Home Folder will be available in the for network drive/network location
Disk Quota:
* You can use disk quota on drives formatted with the NTFS files system to monitor and limit the amount of disk space available to the individual users.
* Disk quota prevents further disk space usages and log on event when a user exceeds a specified disk space limit.
Configuration of Profiles.
Lab - 1: Configuration Local Profiles.
Lab - 2: Configuration Roaming Profiles.
Lab - 3: Configuration Mandatory Profiles.
Lab - 4: Configuration Home Folder.
Lab - 5: Enabling Disk Quota.
Pre-requisites:
Before working on this tab, you must have
1. A computer running windows 2008 server Domain Controller.
2. A computer running windows 2008 server or Windows 7.


SYS1:
Domain Controller
IP Address 10.0.0.1
Subnet Mask 255.0.0.0
Preferred DNS 10.0.0.1
SYS2:
Member Server/ Client
IP Address 10.0.0.2
Subnet Mask 255.0.0.0
Preferred DNS 10.0.0.1
Lab - 1: Configuration Local Profiles:
1. Log on to Domain Controller as Administrator.
2. Go to Active Directory Users and Computers and create Users (Ex:a1, a2).
Verification:
1. Login as User (a1) on Client or Member Server.
2. Right Click Computer → Select Properties, Click Advanced System Settings.


3. Select Setting of User Profiles.
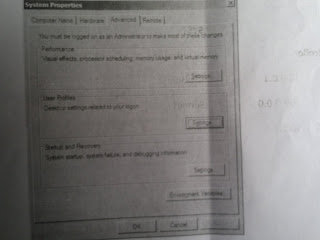

4. Verify for user Profile Type and Status to be Local.


5. Create some files on desktop and go to C: drive → Open Users → Open the user profile(a1) Folder → open desktop folder → verify for the files created on Desktop.
Lab - 2: Configuration Roaming Profiles:
1. Log on to D.C as Administrator, Open Computer → Go to drive and create a shared folder Roam with Everyone as Co-Owner permission.
2. Go to Active Directory Users and Computers → Expand the Domain Name (MICROSOFT.COM) → click Users → Right click the User(a1) and select Properties and select the Profile tab.
3. Under User Profile → enter profile path as:
Syntax:: \\Servername\Shared Folder Name\User Name
Example: \\SYS1\roam\a1.


4. Click Apply and OK.
Verification:
1. Login as User a1 on Client or Member Server and create some files on the Desktop.
2. Then Right click computer Icon and Click Properties and Select Advanced System Settings.
3. Click Settings of User Profiles.


4. Verify for User Profile type and Status to be Roaming.


5. Log off this user (a1) & log in on another computer with the same user (a1), we can see the files which we have created on first computer.
Lab - 3: Configuring Mandatory Profile:
1. Configure a User (a1) Profile as Roaming Profile and Login as the user (a1) on Client or Member Server, Create some files on Desktop and Log off.
2. Log on to server (D.C) as Administrator and Open the shared folder roam.
3. In the shared folder you can find a folder with the user name (a1).
4. When you try to open the folder a1 you will get an error You Don't currently have permission to access this folder, click Continue.


5. Click Security tab.


6. Click Advanced.


7. Select Owner tab.


8. Click Edit.


9. Select Administrators and check the box Replace owner on sub containers and objects, click Apply and Yes → OK → OK → OK.


10. Now open the folder a1 you can find some folders & files.

11. Select NTUSER.DAT file and rename to NTUSER.MAN, click Yes → Yes.

Note: NTUSER.DAT file is an operating system protected hidden file, it will not be visible directly, if it is not visible, then open computer icon → click Tools tab → Select Folder options → Select View tab → Select Show hidden Files and Folders → Clear the check box Hide extensions for known Files Types → Clear the Check box Hidden protected operating system Files → click Yes → Click OK.
12. After renaming it go back to the folder a1, Right click a1 → Properties.
13. Select the Security tab → Edit → Add the User a1 and check Allow Full control, click Apply and OK.

14. Click Advanced tab → Edit → Check the box Replace all existing inheritable permissions on all descendants with inheritable permissions from this object.

15. Click Apply, It will ask do you wish to continue, Click YES and OK.

16. Click Apply and OK → OK.
Verification:
1. Login as User a1 on Client or Member Server.
2. Right click Computer and Click Properties, click Advanced System Settings.
3. Click Setting of User Profiles.

4. Verify for Profile type and Status to be Mandatory Profile.

Lab - 4: Configuration Home Folder.
1. Log on to D.C as Administrator, Open computer → Go to drive and create a shared folder home with Everyone as Co-Owner permission.
2. Go to Active Directory User and Computers → Select User and Right click User a1 and click Properties.
3. Select the Profile tab Under the Home Folder, Select Connect and Select a drive letter Z: and in To: enter \\Server Name\Share Name\User Name.
Example: \\SYS1\home\a1.

4. Click Apply and OK.
Verification:
1. Login as user a1 on client or Member Server.
2. Open Computer, Locate Home folder under network drives.

Lab - 5: Enabling Disk Quota
1. Log on to the computer (D.C) as Administrator.
2. Open Computer → Right click NTFS Drive (Which contains Home Folder) → select Properties, Select Quota tab.

3. check box the box Enable quota management, and check the box Deny disk space to users exceeding quota limit.
4. Click Quota Entries click Quota → New Quota Entry...
5. Enter the User Name (a1) and click Check names, click OK.

6. Select Limit disk space to and enter the quota limit for a1 → Click OK → Close.

7. Click Apply and Click OK.
8. The user a1 can use only 5 MB from this quota partition.
Verification:
1. Login as User a1 on Member Server, Open Computer.
2. Right Click Network drive Z: (Home Folder) → Properties.

3. Check the capacity as 5 MB and click OK.

11. Select NTUSER.DAT file and rename to NTUSER.MAN, click Yes → Yes.

Note: NTUSER.DAT file is an operating system protected hidden file, it will not be visible directly, if it is not visible, then open computer icon → click Tools tab → Select Folder options → Select View tab → Select Show hidden Files and Folders → Clear the check box Hide extensions for known Files Types → Clear the Check box Hidden protected operating system Files → click Yes → Click OK.
12. After renaming it go back to the folder a1, Right click a1 → Properties.
13. Select the Security tab → Edit → Add the User a1 and check Allow Full control, click Apply and OK.

14. Click Advanced tab → Edit → Check the box Replace all existing inheritable permissions on all descendants with inheritable permissions from this object.

15. Click Apply, It will ask do you wish to continue, Click YES and OK.

16. Click Apply and OK → OK.
Verification:
1. Login as User a1 on Client or Member Server.
2. Right click Computer and Click Properties, click Advanced System Settings.
3. Click Setting of User Profiles.


Lab - 4: Configuration Home Folder.
1. Log on to D.C as Administrator, Open computer → Go to drive and create a shared folder home with Everyone as Co-Owner permission.
2. Go to Active Directory User and Computers → Select User and Right click User a1 and click Properties.
3. Select the Profile tab Under the Home Folder, Select Connect and Select a drive letter Z: and in To: enter \\Server Name\Share Name\User Name.
Example: \\SYS1\home\a1.

4. Click Apply and OK.
Verification:
1. Login as user a1 on client or Member Server.
2. Open Computer, Locate Home folder under network drives.

Lab - 5: Enabling Disk Quota
1. Log on to the computer (D.C) as Administrator.
2. Open Computer → Right click NTFS Drive (Which contains Home Folder) → select Properties, Select Quota tab.

3. check box the box Enable quota management, and check the box Deny disk space to users exceeding quota limit.
4. Click Quota Entries click Quota → New Quota Entry...
5. Enter the User Name (a1) and click Check names, click OK.

6. Select Limit disk space to and enter the quota limit for a1 → Click OK → Close.

7. Click Apply and Click OK.
8. The user a1 can use only 5 MB from this quota partition.
Verification:
1. Login as User a1 on Member Server, Open Computer.
2. Right Click Network drive Z: (Home Folder) → Properties.

3. Check the capacity as 5 MB and click OK.
No comments:
Post a Comment