Member Server/Client and User Management
* Clients
A computer joint in the domain with client operating system.
Client operating system like Windows, Vista, Window xp professional, Windows 2000 professional
*Member Servers
A computer joined into the domain with server operating system.
Server operating system like Windows server 2008, Windows server 2003, Windows 2000 server.
*Local User.
A user account created in local database of a computer.
Local users are generally used in (work group) model.
Local users can log-in only on the respective computer.
*Domain
A user account created in Active Directory database
Domain users are used in Domain model.
Domain users can log on to any computer in the DOMAIN

Active Directory Infrastructure
1. Configuration m-s (system 3)
2. Creating D-user (system1-DC) V-log in from system2
3. Password policy (sys1 dc)
L-O GDMC-MJC-default domain policy
C-D
V-create w/o p/w
4. Allow log on locally (sys1-dc)
gpmc-msc-default-domain controller policy
V-O login from dc as user
5. Account lockout policy (DC)
default domain policy
Configuration of Member Server/Client and User Management
Lab - 1: Configuration Client Or Configuration Member Server.
Lab - 2: Creating Domain User Account.
Lab - 3: Changing Default Password Policy.
Lab - 4: Changing Allow Logon Locally Policy.
Lab - 5: Enabling Account Lockout Policy.
Pre-requisites:
Before working on this lab, you must have
1. A computer running windows 2008 server Domain Controller.
2. A computer running windows 2008 server windows 7.
Sys1:
IP Address 10.0.01
Subnet Mask 255.0.0.0
Preferred DNS 10.0.0.1
Sys2:
IP Address 10.0.0.2
Subnet Mask 255.0.0.0
Preferred DNS 10.0.0.1
Lab - 1: Configuring Client (Windows 7)
1. Log in as Administrator to workgroup computer.
2. Right click Computer Icon and click Properties and click change settings.

3. In the System properties dialog box click Change.

4. Select the Member of Domain and enter the Domain Name.(Ex: Microsoft.com).

5. Enter the user name Administrator and his Password, click ok.

6. Welcome Message appears indicating that the computer was successful in joining the domain.
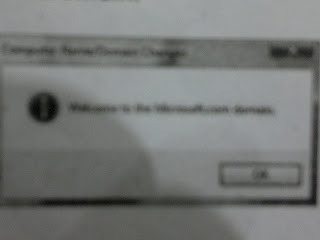
7. Click OK and click Close to close the system properties dialog box. It will ask for restart, Click Yes.
8. After restarting the computer, it will become Client.
Verification:
1. Right click Computer Icon → Properties.
2. Click computer Name, domain, and workgroup setting and verify for the Domain Name MICROSOFT.COM
CONFIGURATION MEMBER SERVER
1. Log in as Administrator to Workgroup Computer.
2. Right click Computer and click Properties and click Change settings.
3. In the System properties dialog box click Change.

4. Select Member of DOMAIN and enter the Domain Name. (Ex:Microsoft.com)

5. Enter the user name Administrator and his Password, click OK.

6. Welcome Message appears indicating that the computer was successful in joining the domain, Click OK.

7. Click OK → click OK and click Close to close the system Properties dialog box. It will ask for restart, click Yes.
8. After restarting the computer it will become Member Server.
Verification:
1. Right click Computer Icon → Properties.
2. Click Computer Name, domain, and workgroup setting and verify for the Domain Name MICROSOFT.COM.

Lab- 2: Creating Domain User Accounts
1. Log in as Administrator to the Domain Controller.
2. Click Start → Programs → Administrative tools → Active Directory users and computer.

3. In the console tree, expand your domain MICROSOFT.COM, and then Right Click users container, Select New User.

4. Specify the First name, and User Logon name and then click Next.

5. Enter the Password and Confirm password for the user account, click Next.

6. Review the configuration setting for the User Account and then click Finish.
Verification:
1. Login as user (User1@Microsoft.com) in Member server or Client.
Lab - 3: Changing Default Password Policy
1. Log in as Administrator to the Domain Controller.
2. Click Start → Program → Administrator Tools → Group Policy Management Console.

3. Expand Forest → Expand Domains → Expand Microsoft.com → Right Click Default Domain Policy and select Edit.

4. Expand Computer Configuration → Expand Policies → Expand Windows Setting → Expand Security Setting → Expand Account Policies → open Password Policy.

5. Double click Minimum Password Length.

6. Change the length value from (7 to 0) and click Apply and OK.

7. Double click Password must meet complexity Requirements.

8. Select Disabled and Apply and OK.

9. Click Start → Run and type GPUPDATE and it refreshes the policy changes.

Verification:
1. Go to Active Directory users and computers and create to user with any password or without any password.
Lab - 4: Changing Allow Logon Locally Policy
1. Log in as Administrator to the Domain Controller.
2. Click Start → Programs → Administrative Tools → Group Policy Management Console.

3. Expand Forest → Expand Domains → Expand Microsoft.com → Expand Domain Controller → Right Click Default Domain Controller Policy and Select Edit.

4. Expand Compute Configuration → Expand Policies → Expand Windows Settings → Expand Security Setting → Expand Local Policies → Select User Rights Assignment → Double click Allow logon locally.

5. Click Add User or Group → Click Browse → Enter the User name → Click OK.

6. Click OK → OK → Apply and OK.
7. Click Start → RUN and Type GPUPDATE and it refreshes the policy changes.
Verification:
1. Log on to Domain Controller as Domain User (User1).
Lab - 5: Enabling Account Lockout policy
1. Log on to D.C as Administrator, Click start → Programs → Administrator Tools → Group Policy Management.

2. Expand Forest → Expand Domains → Expand Microsoft.com → Right click Default Domain policy and select Edit.

3. Expand Computer Configuration → Expand Policies → Expand Windows Settings → Expand Security Settings → Expand Account Policies → Expand Account Lockout Policy.

4. Double click Account lockout threshold.

5. Enter the value for Number of invalid logon attempts(Ex: 2)

6. Set the Account lockout duration and click OK.

7. Close the Group Policy Management Window.
Verification:
1. Enter the password for user (User1) wrongly for 2 times while logging in and the user account will be locked.
Unlocking the locked User account Manually
1. Log on to D.C as Administrator, click start → programs → Administrative Tools → Active Directory Users and Computers.
2. Right click the user (User1) and select Properties.

3. Check the box Unlock account → click Apply and OK.

Verification:
1. Log in as User (user 1) in client or Member Server.
* Clients
A computer joint in the domain with client operating system.
Client operating system like Windows, Vista, Window xp professional, Windows 2000 professional
*Member Servers
A computer joined into the domain with server operating system.
Server operating system like Windows server 2008, Windows server 2003, Windows 2000 server.
*Local User.
A user account created in local database of a computer.
Local users are generally used in (work group) model.
Local users can log-in only on the respective computer.
*Domain
A user account created in Active Directory database
Domain users are used in Domain model.
Domain users can log on to any computer in the DOMAIN

Active Directory Infrastructure
1. Configuration m-s (system 3)
2. Creating D-user (system1-DC) V-log in from system2
3. Password policy (sys1 dc)
L-O GDMC-MJC-default domain policy
C-D
V-create w/o p/w
4. Allow log on locally (sys1-dc)
gpmc-msc-default-domain controller policy
V-O login from dc as user
5. Account lockout policy (DC)
default domain policy
Configuration of Member Server/Client and User Management
Lab - 1: Configuration Client Or Configuration Member Server.
Lab - 2: Creating Domain User Account.
Lab - 3: Changing Default Password Policy.
Lab - 4: Changing Allow Logon Locally Policy.
Lab - 5: Enabling Account Lockout Policy.
Pre-requisites:
Before working on this lab, you must have
1. A computer running windows 2008 server Domain Controller.
2. A computer running windows 2008 server windows 7.

Sys1:
IP Address 10.0.01
Subnet Mask 255.0.0.0
Preferred DNS 10.0.0.1
Sys2:
IP Address 10.0.0.2
Subnet Mask 255.0.0.0
Preferred DNS 10.0.0.1
Lab - 1: Configuring Client (Windows 7)
1. Log in as Administrator to workgroup computer.
2. Right click Computer Icon and click Properties and click change settings.

3. In the System properties dialog box click Change.

4. Select the Member of Domain and enter the Domain Name.(Ex: Microsoft.com).

5. Enter the user name Administrator and his Password, click ok.

6. Welcome Message appears indicating that the computer was successful in joining the domain.

7. Click OK and click Close to close the system properties dialog box. It will ask for restart, Click Yes.
8. After restarting the computer, it will become Client.
Verification:
1. Right click Computer Icon → Properties.
2. Click computer Name, domain, and workgroup setting and verify for the Domain Name MICROSOFT.COM
CONFIGURATION MEMBER SERVER
1. Log in as Administrator to Workgroup Computer.
2. Right click Computer and click Properties and click Change settings.
3. In the System properties dialog box click Change.

4. Select Member of DOMAIN and enter the Domain Name. (Ex:Microsoft.com)

5. Enter the user name Administrator and his Password, click OK.

6. Welcome Message appears indicating that the computer was successful in joining the domain, Click OK.

7. Click OK → click OK and click Close to close the system Properties dialog box. It will ask for restart, click Yes.
8. After restarting the computer it will become Member Server.
Verification:
1. Right click Computer Icon → Properties.
2. Click Computer Name, domain, and workgroup setting and verify for the Domain Name MICROSOFT.COM.

Lab- 2: Creating Domain User Accounts
1. Log in as Administrator to the Domain Controller.
2. Click Start → Programs → Administrative tools → Active Directory users and computer.

3. In the console tree, expand your domain MICROSOFT.COM, and then Right Click users container, Select New User.

4. Specify the First name, and User Logon name and then click Next.

5. Enter the Password and Confirm password for the user account, click Next.

6. Review the configuration setting for the User Account and then click Finish.
Verification:
1. Login as user (User1@Microsoft.com) in Member server or Client.
Lab - 3: Changing Default Password Policy
1. Log in as Administrator to the Domain Controller.
2. Click Start → Program → Administrator Tools → Group Policy Management Console.

3. Expand Forest → Expand Domains → Expand Microsoft.com → Right Click Default Domain Policy and select Edit.

4. Expand Computer Configuration → Expand Policies → Expand Windows Setting → Expand Security Setting → Expand Account Policies → open Password Policy.

5. Double click Minimum Password Length.

6. Change the length value from (7 to 0) and click Apply and OK.

7. Double click Password must meet complexity Requirements.

8. Select Disabled and Apply and OK.

9. Click Start → Run and type GPUPDATE and it refreshes the policy changes.

Verification:
1. Go to Active Directory users and computers and create to user with any password or without any password.
Lab - 4: Changing Allow Logon Locally Policy
1. Log in as Administrator to the Domain Controller.
2. Click Start → Programs → Administrative Tools → Group Policy Management Console.

3. Expand Forest → Expand Domains → Expand Microsoft.com → Expand Domain Controller → Right Click Default Domain Controller Policy and Select Edit.

4. Expand Compute Configuration → Expand Policies → Expand Windows Settings → Expand Security Setting → Expand Local Policies → Select User Rights Assignment → Double click Allow logon locally.

5. Click Add User or Group → Click Browse → Enter the User name → Click OK.

6. Click OK → OK → Apply and OK.
7. Click Start → RUN and Type GPUPDATE and it refreshes the policy changes.
Verification:
1. Log on to Domain Controller as Domain User (User1).
Lab - 5: Enabling Account Lockout policy
1. Log on to D.C as Administrator, Click start → Programs → Administrator Tools → Group Policy Management.

2. Expand Forest → Expand Domains → Expand Microsoft.com → Right click Default Domain policy and select Edit.

3. Expand Computer Configuration → Expand Policies → Expand Windows Settings → Expand Security Settings → Expand Account Policies → Expand Account Lockout Policy.

4. Double click Account lockout threshold.

5. Enter the value for Number of invalid logon attempts(Ex: 2)

6. Set the Account lockout duration and click OK.

7. Close the Group Policy Management Window.
Verification:
1. Enter the password for user (User1) wrongly for 2 times while logging in and the user account will be locked.
Unlocking the locked User account Manually
1. Log on to D.C as Administrator, click start → programs → Administrative Tools → Active Directory Users and Computers.
2. Right click the user (User1) and select Properties.

3. Check the box Unlock account → click Apply and OK.

Verification:
1. Log in as User (user 1) in client or Member Server.
No comments:
Post a Comment